Yoga Plough Pose
Getting Your Hips Up and Your Legs Over Your Head
On page cat links
Plough pose
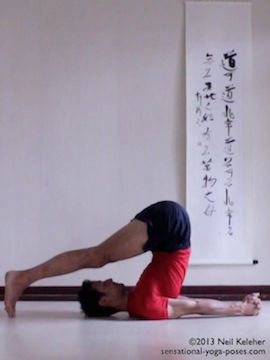
You can think of plough pose (yoga plow pose) as a hamstring stretching yoga poses as well as a forward bend for the hips and spine.
You can also think of it as an inverted yoga pose since the hips are above the head.
In plough pose (or "plow pose", also called Halasana in sanskrit) you lay on your back with your toes touching the floor behind your head. Your arms are clasped behind your body with your shoulder blades squeezed together to help lift your ribcage up off of the floor.
You can also do plough pose with your hands unclasped. Then you'll have to work a little harder to keep your shoulder blades retracted.
Squeezing or "retracting" the shoulder blades is important in this basic yoga pose (and in shoulder stand) because it lifts your lower cervical vertebrae and upper thoracic vertebrae off of the floor. So rather than resting with your body weight on these vertebrae, you rest on the shoulders instead.
Prior to getting your legs up over your head it may be a good idea to first practice retracting your shoulder blades.
Retracting Your Shoulder Blades
While sitting upright with your head pulled back and up with the chin pulled in towards your sternum a little bit, first lift your shoulder blades and then move them towards each other.
The lifting part is important because it helps your collar bones (which attach to your shoulder blades) clear the top of your ribcage. Think of it as "moving your shoulders towards your ears."
Moving your shoulder blades together causes your shoulders to move back so if you have difficulty moving your shoulder blades together, you can focus instead on moving your shoulders up and back. Then once your get that action, focus on feeling your shoulder blades moving towards each other.
Grabbing Your Hands
Once you've gotten the hang of moving your shoulder blades together, then practice grabbing your hands behind your back.
- Note that it you can't grab your hands behind your back while in plough pose, you can always grab the sides of your mat or the ends of a towel.
While sitting upright (or standing) grab your hands behind your back with elbows bent. Then move your shoulder blades together and reach your arms down. As you reach your arms down, work at straightening your elbows. Relax and switch the interlace of your fingers and then repeat.
Do this a few times, and then if you are comfortable with this first part, then focus on lifting your arms behind you, but keep the feeling of "length" in your arms.
Note that to make it easier to move your shoulder blades towards each other, lift them slightly.
You can do the above actions in sync with your breath. As you inhale:
- lengthen your spine,
- lift and retract shoulder blades,
- straighten your elbows,
- lift your arms.
As you exhale
- Relax and return to the start (and switch the interlace of your fingers).
Getting Your Legs Up
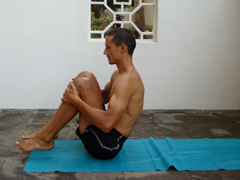
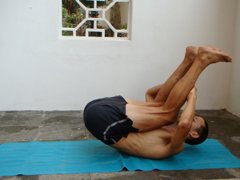
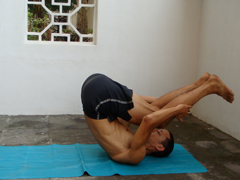
With the shoulders out of the way the next challenge is getting the legs up in plough pose. For this you can practice rolling back and forwards on your back.
See if you can roll slowly and in a controlled manner. Then start the roll starting from a laying down position with your legs up. See shoulder stand for more on rolling.
Supporting Your Toes So that Your Toes Can Support Your Legs
While laying on your back with your hands beside you, lift your legs and "roll" your pelvis off of the floor. Use your hands to help push your pelvis and legs up and over. The further you reach your pelvis up and your legs back, the easier it is to balance on your shoulders.
Keep your weight over your shoulders as you slowly lower your legs behind your head. See if you can touch your toes to the floor behind your head.
If your flexibility is limited you won't be able to get your toes to the floor in plough pose.
- In this case bend your knees and rest them on your forehead (if possible).
- Or do plough pose with a wall behind you and touch your feet to the wall.
- Or do plough pose in front of a chair or stack of books (or a sofa.) Rest your feet on your chosen yoga prop. You can reduce the height of your prop as your halasana opens up.
When you can get your toes to the floor, press them down into the floor and use that force to push your legs and pelvis upwards. You may also find that doing this takes some of the weight off of your neck.
Retract, Grab and Lift
With your toes supported on the floor or on some other object, grab your hands behind your back (or grab a towel or the sides of your yoga mat) and wiggle your shoulder blades towards each other. You may have to move your shoulders towards your ears to retract your shoulder blades. Use your shoulders to lift your ribcage and neck off of the floor.
Straighten your arms behind your back and straighten your knees above your head.
To stretch the back of your neck slowly, slowly work at lifting your pelvis higher while reaching your feet away from your head. Lengthen your spine at the same time, as much as your can.
To stretch your hamstrings, try moving your feet towards your head. To direct the stretch more into the back of your spine try moving your feet away from your head.
Exiting Plough Pose Without Traumatizing Your Neck
To avoid a sudden jarring of your neck when leaving plough pose, move your hips forwards (away from your head), bend your knees, and slowly take your toes off of the floor. Try to get your weight over your shoulders before you lift your toes off of the floor. Or lift one leg up, move it forwards until it balances your other leg, and then lift that leg. Then slowly roll out.
Another option is to brace your neck prior to lifting your legs. To brace your neck slowly press your head into the floor so that the back of your neck feels strong. Then slowly and smoothly lift your feet up.
As you lift your feet see if you can rock your weight onto your shoulders so that you can relax your neck if you choose to.
If you have trouble getting your hips up in plough pose, an option is use a wall as in this description for shoulder stand.
Published: 2011 07 18
