Pincha Mayurasana
Balancing Between the Elbows and the Hands
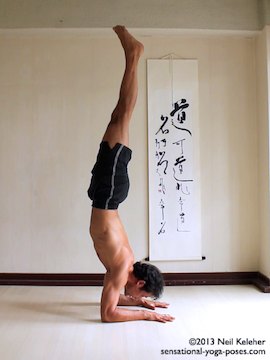
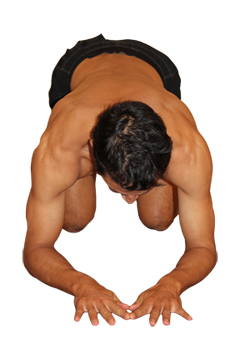
In Pincha Mayurasana the normal position for the arms is to have the forearms parallel. This can be challenging because the natural tendency is for either the elbows to move out or the hands to move in.
An alternative when first learning this yoga pose is to form a triangle with the forearms so that the elbows are shoulder width, and the tips of the index fingers and thumbs are together.
However, working at keeping the forearms parallel does create an interesting challenge. It forces you to improve your shoulder awareness and arm control.
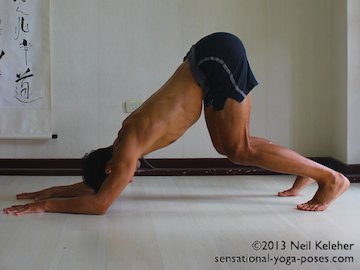
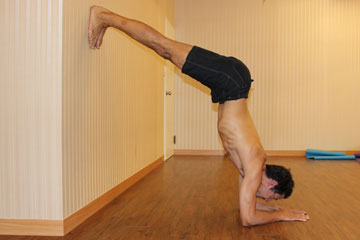
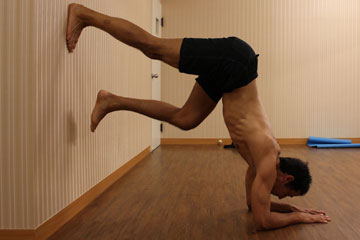
So that you can develop the necessarily shoulder control you can practice this arm position first in a pose called dolphin pose, and then while mimicking pincha mayurasana with your feet against the wall like when doing an L-shaped handstand.
Stretching for Pincha Mayurasana
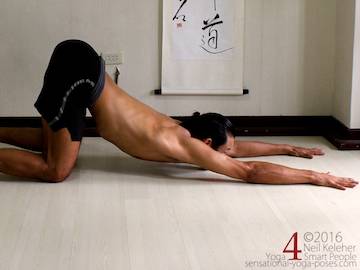
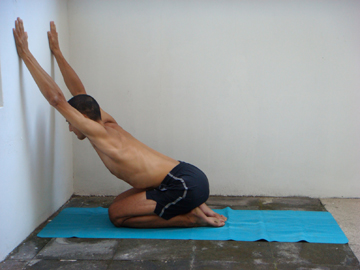
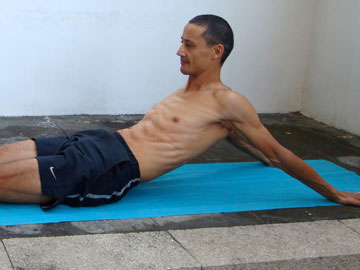
Some basic shoulder stretches you can use prior to pincha mayurasana include Puppy Dog, Spiderman Arm Stretch and for a counter pose, the Rack.
Arm Strengthening for Pincha Mayurasana
To get used to being upside down while in pincha mayurasana, and so that you are able to lengthen your body while upside down, you can use downwards dog and dolphin pose as preparation yoga poses.
In downward dog you can keep your knees bent and you can focus on using your shoulders to push your ribcage and pelvis back and up, away from your hands. You can do this rhythmically in time with your breath.
- Each time you inhale slowly and smoothly press your pelvis away from your hands using muscular effort.
- Each time you exhale, slowly and smoothly relax onto your bones so that your muscles can relax.
Rather than just pushing back, focus on the experience of pushing back. Feel your body both while you are pushing back and once you get there.
Take a rest and then do the same thing in dolphin pose, which is like downward dog but your elbows are on the floor. Now you can do dolphin pose with your forearms parallal, but I would suggest bringing the inside edges of your hands together so that you can use both hands to brace you arms. Keep your elbows at shoulder width so that your upper arm bones are parallel to each other. Now, each time you push back:
- focus on pushing your pelvis back and up, away from your elbows.
- Keep your neck long as you push your pelvis back.
- Use your shoulders to move your ribcage away from your elbows.
- At the same time open and "lift" your ribs to move your pelvis back further.
I say "Lift the ribs" because that is what you would be doing if you were standing. Upside down, the outer edges of your ribs stay almost stationary because your arms are on the floor.
What happens then, is that expanding your ribs cause your spine and pelvis to move away from your elbows and hands.
If that sounds confusing, then focus on making your ribs feel the same as when you lift them while standing or sitting upright.
Don't forget to make your fingers strong. Push your hands together and push the floor with your elbows and forearms!
- Apply pressure slowly and smoothly as you inhale.
- Relax slowly and smoothly as you exhale.
Getting Used to Being Upside Down
The next step in working gradually towards pincha mayurasana is getting used to being upside down.
For this you can use a wall. You'll actually be doing the same thing that you were doing in Dolphin and downward dog but now instead of your feet being on the floor you place them on the wall.
If you are not sure about this you might feel more comfortable doing it with your elbows straight, like in handstand.
First of all place your hands about shoulder width apart. Push your hips up using your arms and spine.
Then place one foot on the wall at the same height as your pelvis. Push this foot into the wall slowly. Your pelvis will then move away from the wall.
See if you can take your other foot off of the floor.
Then come down.
Repeat this a few times, slowly getting comfortable with both feet off of the floor. Then see if you can put both feet on the wall. Once you are comfortable with both feet on the wall, practice going up and down a few times and then try varying the distance of your hands from the wall.
Quick side note. Prior to using the wall, make sure that the area is clear around you so that it is safe to fall. I.e. if you do fall make sure that you won't land on anything sharp, hard or easily damaged (a baby for instance.)
On the other hand, do feel free to use cushions or pillows. If you are going to fall you might as well make it comfortable and fun.
Once you are comfortable doing this on your hands, then try it on your forearms and elbows as if you are doing pincha mayurasana. The process is the same, set up your base first.
- Make sure your elbows are shoulder width apart.
- Place your hands together and make your fingers strong.
- Press your head away from the floor. Use your shoulders
Once you have your base set up, lift your hips up as high as you can. At the same time push your ribcage up and back (almost in opposition to your legs.)
Keep your hips up high and then place one foot against the wall at pelvis height. Then push your hips away from the wall and try to lift the other leg.
Do this gradually and with rhythm. Inhale lift up, exhale come down. Repeat and then take a rest when you need to.
Kicking Up
Once you are used to being upside down, the next step is to practice kicking up. This is so that you can do pincha mayurasana while facing the wall instead of facing away from it. In this case you can start with your fingers and hands facing the wall as opposed to pointing away from the wall.
Keys to kicking up with one leg (scissor kicking) include:
- Keep your abs engaged.
- Use both legs at the same time.
With respect to the first point, keeping your abs engaged, this doesn't have to be a strong engagement, just enough so that your pelvis and ribcage act as one unit. This is so that when you kick, the power of your kick is transmitted to both your pelvis and your ribcage. If you abs are soft and flaccid then all that happens when you kick is that your power goes into bending your spine and possibly twisting it, because power is transmitted to your pelvis and not your ribcage and in the case of twisting, power is only transmitted to one side of your pelvis.
So, try to firm your abs. Engage them just enough that you lock your pelvis and ribcage together while keeping your spine reasonably straight.
Okay, point two, use both legs at the same time. You can have one leg on the floor when you start. Jump with that leg. The other foot can be off of the floor. Swing that leg.
If you have your left foot on the floor and your right foot lifted, you can use your left leg to push your pelvis up. At the same time you can swing your right leg up so that you right leg pulls your pelvis up.
Ideally you'll learn to use these actions together so that both legs help you to get your pelvis up over your head.
Using the Wall For Kicking Up Into Pincha Mayurasana
When first learning to kick, position yourself close enough to the wall so that when you get your legs up you can place your feet on the wall to stop yourself from flipping over on to your back. Also, you can practice kicking with your hands on the floor and your elbows straight, so that you are doing a handstand. It's a little bit easier. Then once you can do it with your elbows straight, then practice with your forearms on the floor.
Once you get used to kicking up and staying up, you can then work at using your legs to push your center of gravity away from the wall. While doing this, notice how your weight shifts via your forearms. Practice moving your pelvis away from the wall and towards it. Feel the shifting of your weight via your forearms.
Rest when you need to.
Positioning Your Center of Gravity in Pincha Mayurasana
Once you are comfortable with kicking up and staying up, the next step is to practice precisely positioning your weight while in forearm stand. To do this focus on moving your pelvis. See if you can position your pelvis so that your center of gravity is over your elbows. You'll feel your elbows digging into the floor. Then try to shift your weight so that it is over the center of your forearms. Then try to shift it so that it is over your hands…. just joking.
You'll probably find that it takes a lot of arm strength to balance on your hands in this position. Optimum, assuming you haven't got any elbow problems, is to balance in pincha mayurasana with your weight just a little bit ahead of your elbows. You'll have to use the muscles at the back of your arms to maintain the same bend in your elbows (the triceps muscles) but this is definitely easier to balance in then if you have your weight centered over your elbows.
Eventually you may want to practice pincha mayurasana without a wall. Make sure that you have a soft surface to land on should you fall. I'd suggest that if you do feel yourself falling, try to roll out of it. And so prior to doing this yoga pose freestanding, practice rolling out. The even better option is to go to a class and have someone you trust, like a teacher who understands the basics of balance, or a gymnastics coach, spot you.
Once you are comfortable doing this free standing, or even if you are doing it with a wall to catch you, play with different arm positions. Compare pincha mayurasana with
- arms parallel,
- arms in a triangle with palms flat, or
- arms in a triangle doing "knife hand." You can even do it with
- fists closed.
More...
For more on learning to feel balance and control it read yoga balance poses.
For an even better understanding of balances check out the ebook balance basics.
For more on inverted yoga poses (and how to take the balance component out) check out inverted yoga poses.
Published: 2011 04 05
