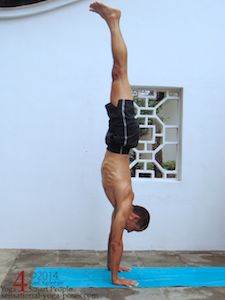
Rocking Forwards and Backwards
You can get ready for lifting into handstand by rocking backwards and forwards while in a standing forward bend.
Have your feet about hip width apart, or wider if necessary. At the same time have your hands on the floor ahead of your feet. If your hamstrings are tight you can have your hands on blocks.
- Rock forwards so that your weight shifts onto your hands and the fronts of your feet.
- Press your hands down into the floor or into the blocks as you rock forwards so that your arms bear the weight of your ribcage.
- Then slowly rock back so that your weight is entirely on your feet. Your arms can relax at this point.
If your hamstrings are flexible you can bend your elbows as your rock forwards but at the same time keep your arms strong. Use your arms to press your hands into the floor whether you elbows are straight or bent. Relax your arms as you rock back, let your legs take your weight.
You'll find a rhythm as you rock forwards and back. If you hands are on the floor, engage your arms as you rock forwards and then engage your legs as you rock back.
Lengthen Your Neck
Once you are comfortable with these actions, take a brief rest and then do them again. This time:
- As you rock forwards focus on lengthening your neck.
- As your rock back relax your neck.
As you lengthen your neck see if you can feel your upper ribcage opening a little. Lift your head a little as you do this and look forwards. Look at a point about a foot ahead of your hands. Relax as you rock back.
In handstand, especially while lifting into handstand, your ribcage is the base from which your shoulders act to support your arms. If you expand your ribcage and make it firm you give your arms a firm foundation for supporting your body. Lengthening your neck is one way of opening and firming your ribcaage so that your arms have a firm base.
In handstand, your arms, spine and ribcage together support the weight of your pelvis. By lengthening your neck, you help to shape your ribcage, which in turn helps to make your spine straight so that it can better help you to use your arms to lift your pelvis.
Straighten Your Thoracic Spine (or Bend it Backwards)
Once you are comfortable with lengthening your neck, use your spinal erectors to bend your thoracic spine backwards. The feeling is like sucking your thoracic spine into your body. You may not actually get your spine to bend backwards but if you at least activate these muscles you'll give the spine the support it needs so that it can in turn support the weight of your pelvis.
Engage Your Abdominals
Another important element when lifting into handstand (or just holding handstand) is using your abdominals to "lock" your ribcage to your pelvis. Your abdominals dont' have to be super strong to do this. You just have to engage them enough so that your ribcage and pelvis act as one unit. This one unit is then much easier to control and balance on top of your arms and hands.
One way to practice engaging your abs is to twist while sitting with your hands in prayer. This forces you to use your abdominals, particularly your obliques, to turn your ribcage relative to your pelvis. If you memorize this feeling, that of your abs engaging, you can then use that same feeling to engage your abs while keeping your ribcage square to your pelvis.
Another way to engage your abs is to pull your front of the lower part of your ribcage downwards and inwards towards the top of your pelvis.
Once you can activate your abs, practice it while bending forwards. I would suggest engaging them while inhaling and relaxing while exhaling since it is the inhale in which you are trying to lift up into handstand.
Pressing Your Hands Down In Order To Lift Up
Once you get comfortable with shifting your weight onto your hands, the next step with the arms is to shift weight onto your arms with your hands further back.
Initially you had your hands ahead of your feet. Now you can move them back a little and again practice rocking backwards and forwards. Again, if you hamstring flexibility is limited use blocks under your hands and/or bend your knees.
Practice feeling your arms "engaging" as you shift your weight forwards. Feel your legs engage as you shift your weight back.
Next, try placing your hands beside your feet. Instead of rocking your weight forwards on to your hands (and then back) now you have to press your hands into the floor in order for them to take the weight of your body.
Do this with the same rhythm as when you were rocking backwards and forwards, but now, instead of rocking backwards and forwards, press your hands into the floor and then release. As you press your hands down into the floor, try positioning your spine so that you push up on your pelvis at the same time.
The straighter you can make your spine the easier this may be.
The next two steps aren't critical, but they may help you improve your forward bend and more importantly, help you control your weight and your pelvis as you try to lift into handstand with knees straight.
Engage Your Mula Bandha
My understanding of mula bandha is constantly evolving. I believer that part of it involves activating your spinal erectors to pull your tailbone back. If you are already engaging your spinal erectors to bend your spine backwards, extend the sensation so that it feels like you are using them to "suck" your sacrum back. Feel as if you are using them to flick your tailbone back as well. (In animals the equivalent would be lifting your tail.)
Keep pulling your tailbone back and then at the same time use your pelvic floor muscles, particularly Pubococcygeus to pull your tailbone forwards. Pubococcygeus attaches between the tailbone and the pubic bone so you can actually use it to pull your tail bone forwards.
Keep these two actions as you rock on to your hands. Reach your legs away from your hip joints (reach your thigh bones out of the hip sockets) and work at lifting your legs.
Putting It All Together
As you press down into your hands the sequence of action to help lifting into handstand is:
- Activate your arms
- Lengthen your neck
- Straighten your spine
- Activate your abdominals
- Engage mula bandha
- Reach your legs down
- Pull your pelvis forwards and lift your legs up at the same time
If your hands aren't beside your feet but slightly ahead of them, the feeling as you press into your hands and shift your weight forwards is like you are about to fall forwards. "Almost" allow this to happen but use your fingers to help keep your center over your foundation. You may need to bend your knees to get your legs off of the floor, that's fine.
Whether your knees are bent or straight focus on smoothly getting your weight over your hands as opposed to jumping up. (Although jumping up might be an intermediate step.)
Then pull your hips forwards and your legs up.
Your Shoulders Will Go Forwards in Handstand
One of the things that you'll find is that while lifting into handstand (whether with your knees straight or bent) your shoulders will have to reach quite far forwards with respect to your hands. You may have to spend a few sessions getting your shoulders used to this.
If you work at rocking back and forwards smoothly you may find that this exercise in and of itself feels good. If you allow yourself to focus on feeling this action you may find that the foot lifting comes almost naturally, without thinking, without (too much)trying.
Again if you have to bend your knees at first that's fine. Doing it with the legs straight is a little more difficult, especially for your shoulders. Going up with legs straight your shoulders will have to move even further forwards, until the point where your legs reach horizontal. Then from there your shoulders can gradually move back so that they are over your hands.
Feel Your Center
So that you can stay balanced throughout all of this practice using your hands to feel where your center is. Try to keep your center over the center of your palms, or slightly forwards, over the base of your fingers (where your fingers join your palms.)
Once you get your feet off of the floor, to continue to lift them up easily into a full handstand, shift your weight forwards so that it almost feels like you are about to fall forwards. This will help to get your feet up. Then shift your weight back so that you catch yourself before you actually do fall forwards.
Breathe While Lifting into Handstand
Once you have all of the steps, don't worry about them. Instead focus on feeling them and focus on rocking forwards and up with your breath. Use your inhale. Start your inhale prior to rocking forwards and prior to lifting up so that the muscles that you inhale with help to stabilize your ribcage and provide a base for your arms.
The other thing, is to think "up." Yes, a large part of your awareness should be on your base, your foundation, your connection with the earth, but the rest of your body, the part reaching up, is no less important.
One way you can use your breath to integrate all of these acts is to start your inhale when your press into your hands and then imagine your inhale travelling up your arms, torso and out through your legs. You may find that this visualization helps you to lift into handstand with a minimum of effort.
Then, once you are up, see if you can come down with just as much control as you went up with.
By the Way, You Can Use a Wall
By the way, if the idea of lifting into handstand in the middle of the room scares you, then use a wall. Just make sure that you are close enough to the wall that it can catch your safely if you fall. But also make sure that you are far enough that you can lift your head a little as you look forwards.
One final trick
If you lean forwards so that you weight is on your hands, lift your hands just enough that you start to fall forwards. Then put your hands down again and straighten your elbows.
When you lift your hands, allow yourself to fall forwards, then place your hands on the floor with your elbows bent so that you continue to fall, then straighten your elbows to push your body up. Lift your legs at the same time.
When you put your hands down, use them in such a way that you do not dissipate the energy of falling forwards. Instead, use them to help use that energy so that you lift up into handstand.
Do the same trick without lifting your hands. Insted, focus on pushing your hands into the floor. Focus on making your arms feel long. (Make your spine and legs feel long at the same time.)
Published: 2011 07 22


