Fallen Arches
And Foot Exercises for Fixing Them
The following foot exercise developed in part from the fact that I have fallen arches. I learned to roll my shins outwards as a way of forming the arches of each foot. This made my flat feet look not-flat.
This exercise gave me enough awareness and control of my feet and ankles that I now don't need to wear arch supports.
I now use these exercises regularly when I'm teaching yoga classes.
Rolling Your Shins Out
The first part of these foot exercises involves rolling your shins outwards and then inwards.
The exercise can feel meditative if you focus on doing is slowly and smoothly.
When doing these exercises:
- Stand with your feet about hip width apart (or wider.)
- Position your feet so that your toes point straight ahead.
- Have your knees slightly bent and keep them bent.
- Once you are used to doing them with knees bent, try them with knees straight.
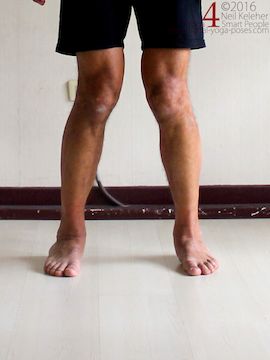
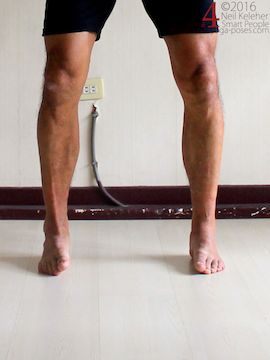
Shins rolled in, then shins rolled out (ooops, my inner foot is lifting!)
The rolling outwards part is where you activate your arches or make your flat feet Non-Flat.
The inwards parts is where you relax your feet.
By "rolling your shins outwards and then inwards" as opposed to just holding your shins rolled outwards, it makes it easier to feel when your feet are active and when they are not. You can learn to fix your fallen arches at will.
When rolling your shins outwards, use the muscles of your feet and ankles to do the rolling. Avoid using your hip muscles. Use the muscles of your feet and ankles to help lift your fallen arches.
- Notice how when you roll your shins out, the center of the inner arch of your foot lifts... well at least that's what happens to mine when I do this exercise!
- You can also watch the tendons at the top of your foot. Notice how their fan pattern changes as you roll your shin.
- You can also look at the back of your heel and ankle. (Use a mirror.) Notice how your Achilles tendon becomes straighter, more vertical, when your shins are rolled outwards.
When your shins are rolled out, you are helping to stack the two bones of your heel (the calcaneus and talus.) They can then align with gravity to better support the weight of your body. (This is as opposed to using muscle power.)
- Rolling your shins out while doing this foot exercise, your pelvis may roll back slightly.
- Rolling your shins in your pelvis may roll forwards.
Allow this to happen and focus on feeling your shins, feet and ankles while doing this action.
The Outer Edge
I find that there is a natural tendency for the outer edge of my foot to press down as I roll my shins out. Once I've gotten used to the rolling action, I then emphasize the downward pressing of my outer foot as I roll my shins out. I release this action when letting the shins roll inwards.
You can do the same thing. Rather than forcing the outer edge of your foot down, see if you can feel it as it moves closer to the floor. You might try shifting your weight forwards or back a little so that the base of your little toe presses down with just as much pressure as your heel.
Release as you allow your shins to roll back in.
An important note: The idea of pressing down through the outer edge of your foot isn't to lift your inner foot (I believe that is called "Eversion.")
The idea is to press down without lifting your inner foot.
You may feel a slight "activation" just below the center of the back of your lower leg as you do so.
Three Additional Actions
This foot exercise involves other actions that you can add to on to the basic exercise one at a time. Each of these actions helps make flat feet unflat by training the muscles that help to support your foot in a non-flat footed configuration.
As you roll your shins outwards:
- Press your weight down through the base of your little toe. (Mentioned above.) Don't "lift" the inner edge of your foot to do this!
- Lift the center of the arch of your outer foot.
- Press down through the base of your big toe. Pull the base of your big toe back towards your heel. It will feel like you are gripping the floor with your feet!
Add these modifications on one at a time, getting comfortable with each action before adding on the next action. Practice first rolling your shins outwards and inwards. Then as you roll outwards press down through the base of your little toe. Relax this action as you roll your shins inwards. Practice a few times and then add on the next action until you are comfortable doing all of the above actions as you roll your shins outwards. You then relax those same actions when rolling your shins inwards.
Learning to Use Minimum Effort
Ideally you won't have to do these foot exercises all of the time in order to correct for fallen arches. Instead you simply learn to relax your foot or activate it at will. But prior to that the actually fifth step comes into play once you've learned the elements of "Activating your foot." When you can activate your foot completely the next step is to practice using the minimum effort necessary to activate your foot.
What does minimum effort mean?
By activating your foot you are using the muscles of your foot, ankle and lower leg to position the bones of your foot ankle and lower leg. Ideally the positioning is such that the bones in your lower leg support the weight of your body and the forces acting on it. Anything more is wasted effort. In addition, you may also want to use your feet to help you feel where you center of gravity is. For that the more relaxed your feet are, the easier it is to use them to sense where your weight is.
Actually, in general, the more relaxed you are given what you are trying to do, the easier it is to feel your body.
It's a trial and error process and the best way to trial and error (well one way to do it anyway) is to move your feet. Practice activating your feet and relaxing them, and see how little effort you can apply in order to shape your feet "ideally."
Published: 2020 08 05
