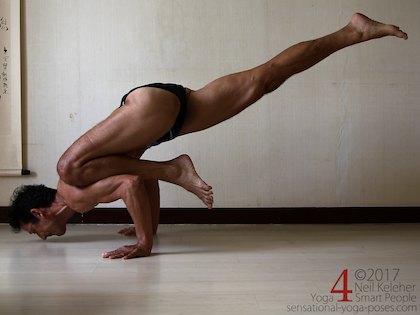
Eka Pada Bakasana
Getting into Eka Pada Bakasana from Marichyasana A
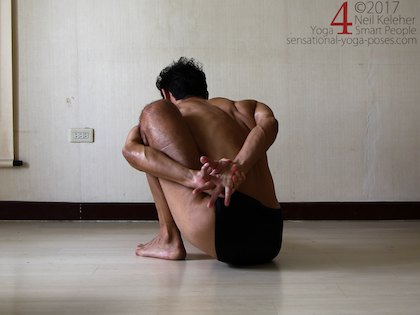
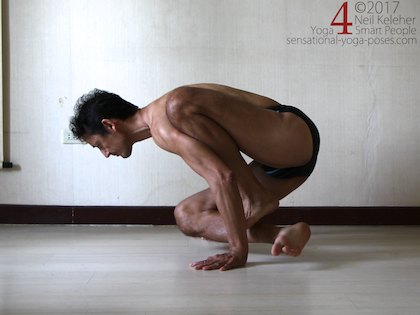
After about a year of doing Ashtanga Yoga there was a guest teacher at the studio I was practicing at. When we got to marichyasana A, she had us try to lift up after each side and from there move into eka pada bakasana.
While I didn't get the second part, I did get the first part, the lift up.
That was one of the best parts of doing Marichyasana A, the chance to try that transition when switching sides and when moving on to the next pose (Marichyasana B or, for those lacking in experience, Marichyasana C.)
Practice Feeling and Controlling
I haven't done this transition much but I'm happy to say that I can still do it. And the reason is (I like to think the reason is) that I practice being aware while doing yoga. And I also practice feeling and controlling isolated parts of my body. So even though I might not practice something for awhile, this focus on practicing body awareness (or proprioception) and body control allows me to still do poses even though I don't always practice them.
(One strong exception in this regard is Wheel pose. I can leave of doing that pose for a few months and it's like all the hard work I put into making the pose easier is wasted.)
Pressing the Shin when Lifting Up from Marichyasana A
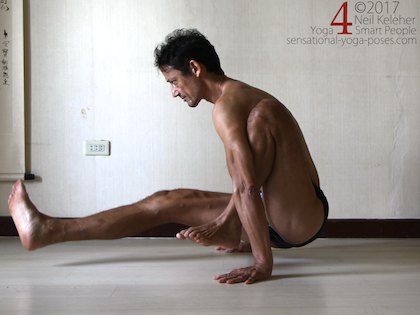
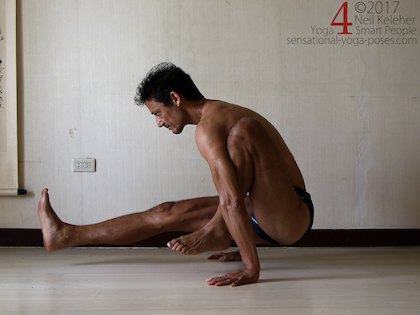
When lifting up from Marichyasana A an important part of the action is pressing the shin of the bent knee against the back of the arm. At the same time resist with the arm. It may feel like you are pushing the arm and leg against each other.
This action may be easier to do after coming out of the bind in Marichyasana A since in the bind you may tend to push the arm against the leg anyway.
This pose also requires abdominal and hip flexor strength to keep the straight leg lifted. And you may find the quadriceps (more than likely the rectus femoris portion) cramping if you hold this lifted position for any length of time.
Now this lifting up from marichyasana a is actually the easier part of the whole moving back to eka pada bakasana.
Transitioning from Lifting Up into Eka Pada Bakasana.
The first part of transitioning from the lift up is to bend the straight leg knee and move the shin inwards and back, between the hands. It's almost as if you are trying to move the leg into the front leg position of yoga pigeon pose, the difference being that the leg is lifted.
Getting to this point can be relatively easy assuming you have the hip flexibility. (If you haven't, you might want to practice pigeon pose glute stretch as part of your preparation work.)
Focus on Lifting Your Hips Higher
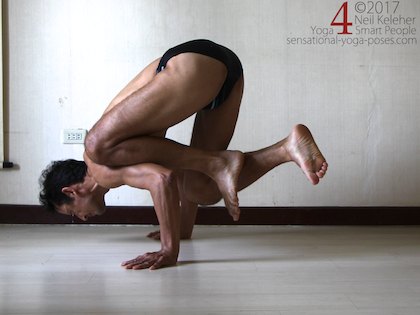
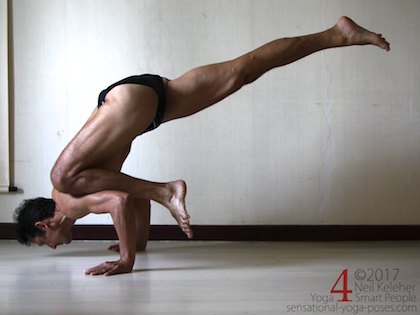
To get the foot behind your hands you may have to lift your hips higher. Note the height difference of my pelvis in the second picture above and the one below.
Note that throughout all of these actions you'll have to keep pressing your shin against your upper arm. This is what will help keep your hips and lower lifted, and in order to reach the leg back into a full eka pada bakasana you'll have to keep pressing the shin against the arm.
To lift your hips higher try increasing the pressure of your shin against your arm. Feel as if you are trying to open the knee of your supporting leg. Or try creating space between the heel and buttock of your supporting leg. The actual amount that your knee opens may only be slight. The important point is using it (or some other method) to lift your hips higher.
Staying Balanced As You Reach the Leg Back in Eka Pada Bakasana
If you've gotten this far, you are nearly there. If you can lift your hips then all you have to do afterwards is reach the bottom leg back and up, straightening the knee as you do so.
If you are used to balancing, you'll understand that as your leg reaches back, you'll have to reach your body forwards to keep your center of gravity over your hands.
Feel Your Hands While Moving into Eka Pada Bakasana
One way to do this is to focus on feeling your hands. If you feel the heels of your hands pressing down strongly but the front of your hands pressing down lightly, you'll know that you are tipping backwards and so the response is to shift your body forwards more.
Since the shin is on your arm, this means that your arms and leg and torso will move forwards more or less together. As a result you'll be changing the angle of your forearms with the floor. Your elbows will move forwards relative to your wrists. (Or at the very least, the elbow of the arm which is supporting your leg will move forwards.)
Try to Get Your Hips Over Your Hands
Note that the higher you reach your hips up in eka pada bakasana (and or your leg) the less far forwards you'll have to move. On the other hand, if you reach hips are further rearwards, and as a result lower, you'll find that you will have to reach your body further forwards in order to stay balanced.
As a case in point, in the second picture above, my hips are higher. They are almost over my hands. As a result I don't have to move as far forwards to stay balanced. Note how in the second picture my left elbow isn't as far forwards as it is in the first picture.
Shin Pressure is Important
If you again look at the last two pictures above, you'll note that in the picture where my hips are higher, my knee is more open. It's almost opened to 90 degrees while in the other picture my knee is more closed.
This is a result of pressing down more strongly with the shin in the second picture so that my hips lift higher.
Being able to vary pressure (with which you press other parts of the body, or the floor) can be an important element in improving body awareness and body control. The intelligent use of pressing actions can lead to being able to do more difficult poses with greater ease. It's one of a few basic techniques that I teach in the Learn to Feel Your Body collection.
Published: 2017 11 17
Updated: 2021 02 09
